In the previous post, I shared few tips on how to plan your trip to Japan, especially if you’re travelling with kids. Today I’ll share more about creating and customising your itinerary for your trip. As I’ve mentioned before, Japan is a big country and it’s best for you to focus on certain parts of Japan, or themes you want to do (such as rural Japan, snow festival, traditional Japan, or something else). For most people going to Japan for the first time, they do tend to focus on the standard Tokyo-Osaka-Kyoto, or replacing either Osaka or Kyoto with Hokkaido.
Update May 2018
- Previously I’ve mentioned the price for a full-fare airlines from Tokyo to Hokkaido was AU$300. This has been changed and rectified to on average AU$100 with budget airlines.
- Previously I’ve noted the price for a shinkansen ride from Tokyo – Osaka is AU$250. I was mistaken and it’s actually around AU$150. However the recommendation to get JR Pass unless you’re traveling twice or more with shinkansen still stands.
The Default Trip
The reason why Tokyo-Osaka-Kyoto is such a popular default destination is that they’re geographically close together. A single shinkansen or bullet train ride from Tokyo to Osaka will take around 2.5 hours of your time, and cost around AU$150. Then from Osaka, you can go to Kyoto with a normal train railway for around AU$7 for a one-way ticket, and will only take you 40 minutes.
You can of course ride shinkansen between Osaka-Kyoto, but you would have to pay more (if not using JR Pass), and it’ll probably only save you around 10-15 minutes. Note that in my previous post I suggested you get the JR Pass if you’re going to travel at least 2 (two) times using shinkansen.

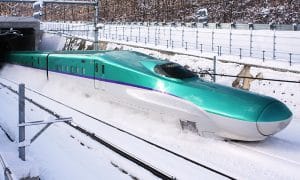
The Miku-themed Hokkaido Shinkansen
Some people do switch either Osaka or Kyoto with Hokkaido or depending on how long your trip is, add Hokkaido to their itinerary. Note that currently there is no direct shinkansen ride to Sapporo, Hokkaido’s main hub. You will have to either fly to Hokkaido (which will cost you around AU$100 one-way depending on the airline) and taking 1.5 hours of your time; or take a shinkansen to Shin-Hakodate Station, which will take around 4 hours, and then another 3.5 hours to go to Sapporo (totaling of at least 7.5 hours of trip from Tokyo-Hokkaido).
Using Itinerary Planner
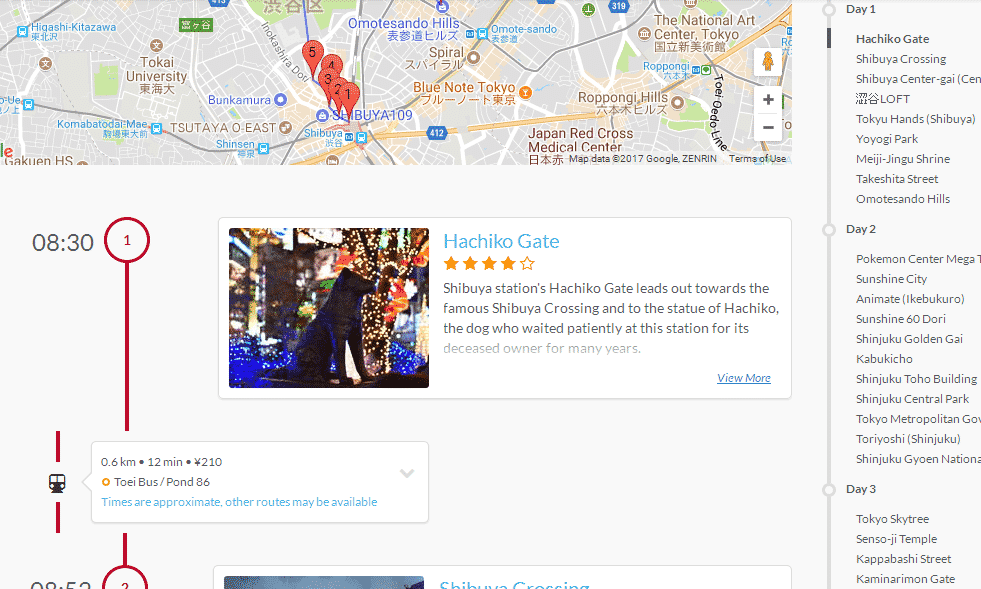
No matter what you want to do, though, it’s important to sort out your itinerary. I have used this particular website, Odigo.jp, and utilised their trip planner. It simplifies your itinerary by a considerable amount, and it also helps you build your itinerary, by providing the popular spots, scenic spots, stores, and others.Although it doesn’t have every available stores and
Although it doesn’t have every available stores and spot (mainly those hidden gems you can only find yourself), the best thing about this application is that they automatically optimise your route on any given day. It also provides a step-by-step guide to go from point A to B, along with the estimated public transport price.
Disclaimer: I am not affiliated with Odigo.jp in any way or form. This referral is purely because I have used their website application to build our itinerary when we went to Japan, and have found their website has helped significantly for our first trip to Japan.

Odigo Trip Planner
During our last trip, we found that the price estimate was accurate, and it even covers bus trip prices (which if you’ve taken any on your trip, is confusing as heck). It certainly made our itinerary so much easier to create, and then save it as PDF, making it convenient especially for first timers going to Japan. Also, since most of the popular spots in Japan is outdoor, you need to be able to change your itinerary if the weather on the next day is going to rain, and Odigo allows you to do that.
Another noteworthy thing to mention is that when you do arrive in Japan, they usually have special or discounted prices for foreigners or tourists visiting Japan in popular spots, such as Tokyo SkyTree. Make sure to bring your passport everywhere you go to make use of this when available and grab the brochures while you’re there, because sometimes the brochures have discounted prices on some of the other tourist spots as well.
If You Prefer Old-School
Now if you do prefer an old-school way of doing things (hey, I don’t judge), you can create your itinerary using various websites or travel books like Lonely Planet. A good trick is to open up travel websites that offer Japan trip package, and start from there to create your very own itinerary. I’ve used this trick to check whether I’ve missed any places, or whether I’ve allowed myself enough down time before I continue my journey.
For the Parents
For the parents out there, sorting out your itinerary comes with one extra step: making sure it’s baby/infant/toddler-friendly. As I’ve mentioned in the previous post, most big tourist spots or shopping malls in Japan is baby-friendly, but in a lot of places, you’ll find it difficult. I have used this website, in addition to Odigo to create our itinerary for our first trip to Japan: Tokyo Urban Baby.
Again, I’m not affiliated in any way or form with Tokyo Urban Baby, but I’ve found her suggestions and tips very useful, especially when we had to modify our itinerary due to bad weather.
Creating your itinerary for your first trip to Japan can be exciting, confusing, and overwhelming all at the same time. I’ve shared with you several websites to help you plan it. However don’t merely follow the books or the websites, you will enjoy Japan a lot more if you create your own itinerary. And even if you have a very extensive list in your itinerary, I guarantee you will still find small places that are going to awe you while you’re there.
Hope that helps you a bit in creating your itinerary. In the next post, I’ll start to share about our itinerary while we were in Japan.
